Determining your ring size is the foundational step in selecting a piece of jewellery you will cherish and wear for a lifetime. The most reliable methods for discovering how to measure ring size at home are surprisingly straightforward, often requiring little more than a piece of string or a ring you already own and an accurate chart. Getting this measurement right from the outset ensures your special piece, particularly something as meaningful as an engagement or wedding ring, will fit perfectly from the moment you receive it.
Why an Accurate Ring Size Is Essential
Achieving the correct ring size is about far more than comfort—it's a matter of security for your treasured jewellery. A ring that is too loose is constantly at risk of slipping off unnoticed. Conversely, a ring that's too tight can be uncomfortable and difficult to remove, sometimes even becoming stuck. When investing in a significant piece like a diamond ring, precision is non-negotiable.
An accurate measurement ensures the ring not only looks stunning but also feels like it truly belongs on your hand. It also helps you avoid the expense, hassle, and potential damage of resizing, a process that can sometimes compromise the original design and structural integrity of the band. A perfect fit instills the confidence to wear your ring every day, without a second thought.
Understanding Australian Ring Sizing
In Australia, our approach to ring sizing is unique. If you've ever been puzzled by a letter instead of a number, it's because our system is distinct, and understanding its principles is key to a successful purchase.
- The Alphabetical Standard: We utilize a letter-based scale for ring sizes, typically running from A (the smallest) to Z+ for larger sizes, with half sizes available in between.
- UK Alignment: Fortunately, the Australian sizing system is almost identical to that of the United Kingdom, which simplifies purchasing from British jewellers.
- Measurement Basis: Each full letter size corresponds to a precise increment in the ring's internal circumference, ensuring consistency and accuracy across all jewellers.
For example, an Australian size J ring has an inner diameter of approximately 16 mm. This standard was officially updated in 1987, defining each size division as a 1.25 mm increase in circumference to guarantee absolute precision.
A common pitfall is assuming a direct conversion from a US numeric size to an Australian alphabetical one. This is incorrect. Always cross-reference your measurement with a validated Australian chart to prevent errors and ensure a perfect fit.
Once you understand how to measure your finger accurately and translate that measurement to our alphabetical system, you can shop with complete confidence. You'll be prepared to explore an array of beautiful designs, from classic solitaires to the best personalized rings for moms. Our goal is to demystify this process so you feel empowered and in control.
For a comprehensive overview and a printable chart, we invite you to consult our detailed ring size guide.
Australian Ring Size Conversion Chart (Alphabetical vs. Diameter)
To simplify the conversion process, we have compiled this quick-reference chart. This table allows you to convert your finger's diameter in millimetres (mm) to the standard Australian/UK alphabetical ring size, providing an at-a-glance tool for interpreting your measurements.
| AU/UK Alphabetical Size | Inner Diameter (mm) | US/Canada Numeric Size |
|---|---|---|
| H | 14.86 | 4 |
| I | 15.27 | 4 ½ |
| J | 15.60 | 4 ¾ |
| K | 16.00 | 5 ¼ |
| L | 16.41 | 5 ¾ |
| M | 16.81 | 6 ¼ |
| N | 17.22 | 6 ¾ |
| O | 17.63 | 7 ¼ |
| P | 18.03 | 7 ¾ |
| Q | 18.44 | 8 ¼ |
| R | 18.85 | 9 |
| S | 19.25 | 9 ½ |
| T | 19.66 | 9 ¾ |
| U | 20.07 | 10 ¼ |
| V | 20.47 | 10 ¾ |
| W | 20.88 | 11 ¼ |
| X | 21.29 | 11 ¾ |
| Y | 21.69 | 12 ¼ |
| Z | 22.10 | 12 ¾ |
Whether you have used the string method or measured an existing ring, this chart is an indispensable tool for translating your raw measurement into the correct alphabetical size required when shopping with us or any other Australian jeweller.
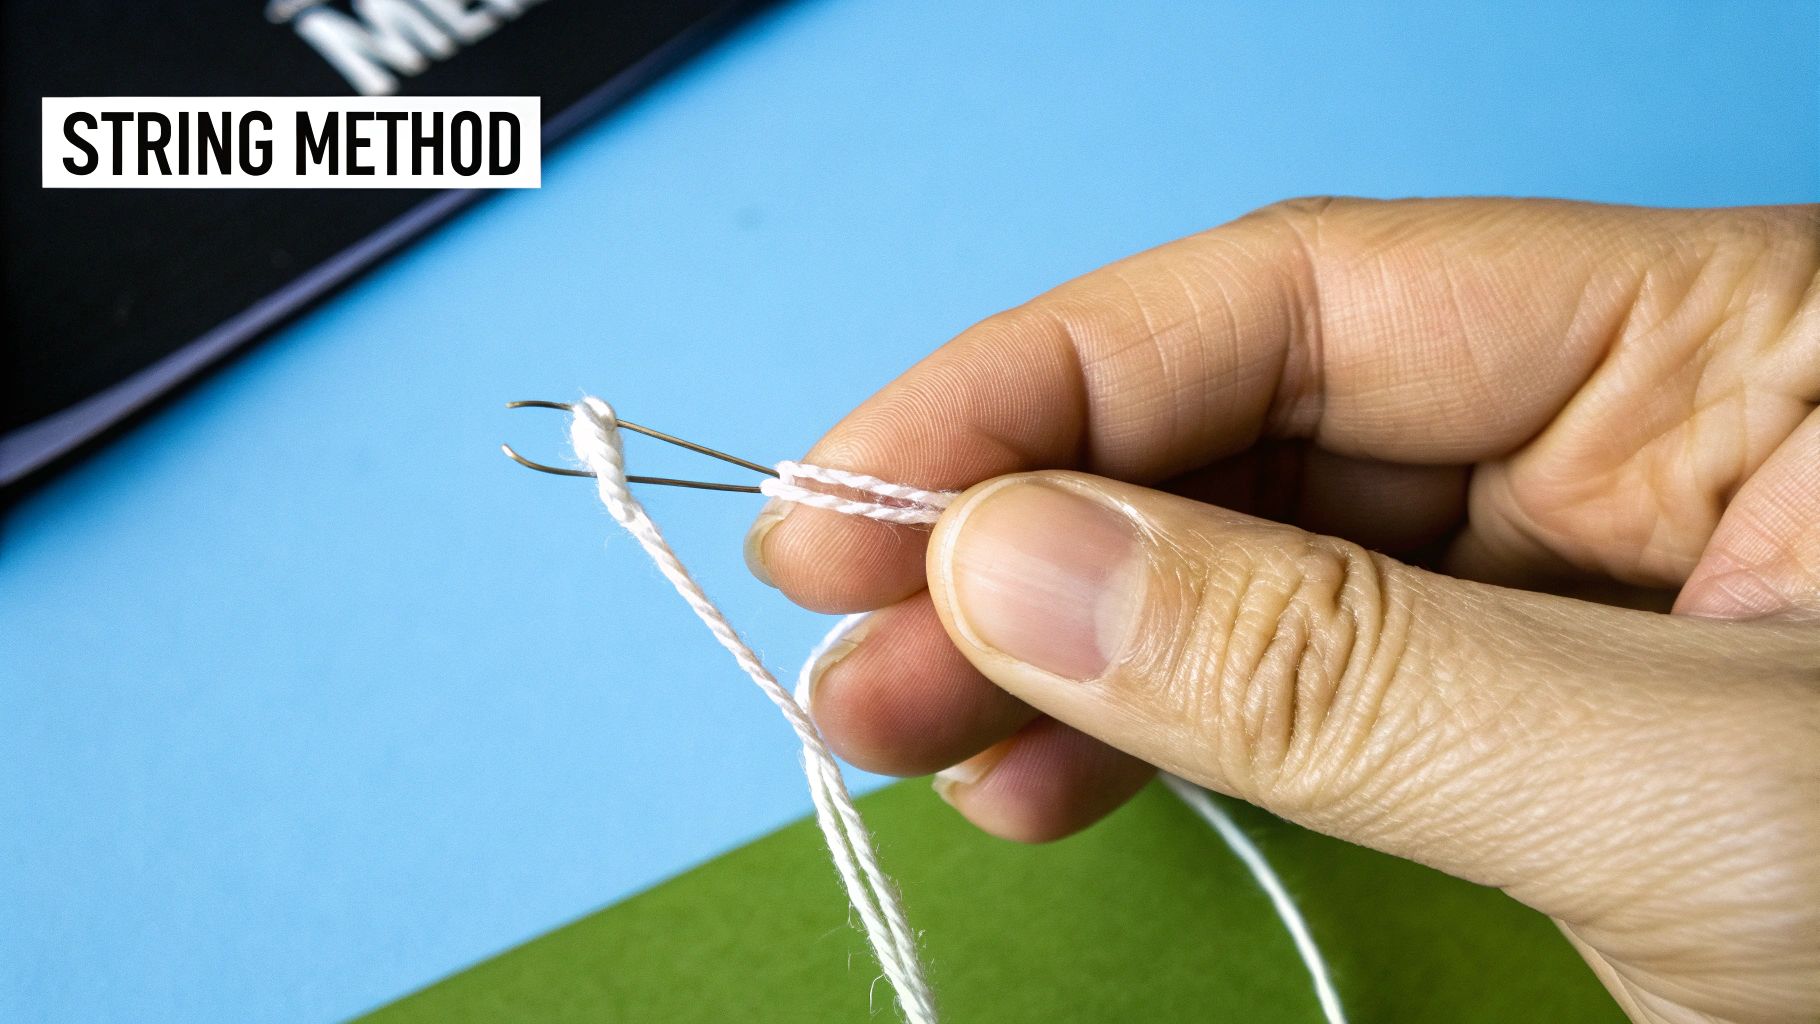
Mastering The String and Paper Measurement Method
The classic string and paper method is a remarkably reliable technique for determining your ring size at home. It is the go-to approach when you need an accurate sizing without specialized tools, and when executed with care, the results are impressively precise.
The principle is simple: you are measuring the circumference of your finger. However, the secret to accuracy lies in precision. The most critical element is using a material that does not stretch. Dental floss, a thin ribbon, or a strip of paper are ideal as they maintain their shape and will not yield a misleadingly small measurement.
This image demonstrates the correct way a paper sizer should wrap around the finger for an accurate reading.
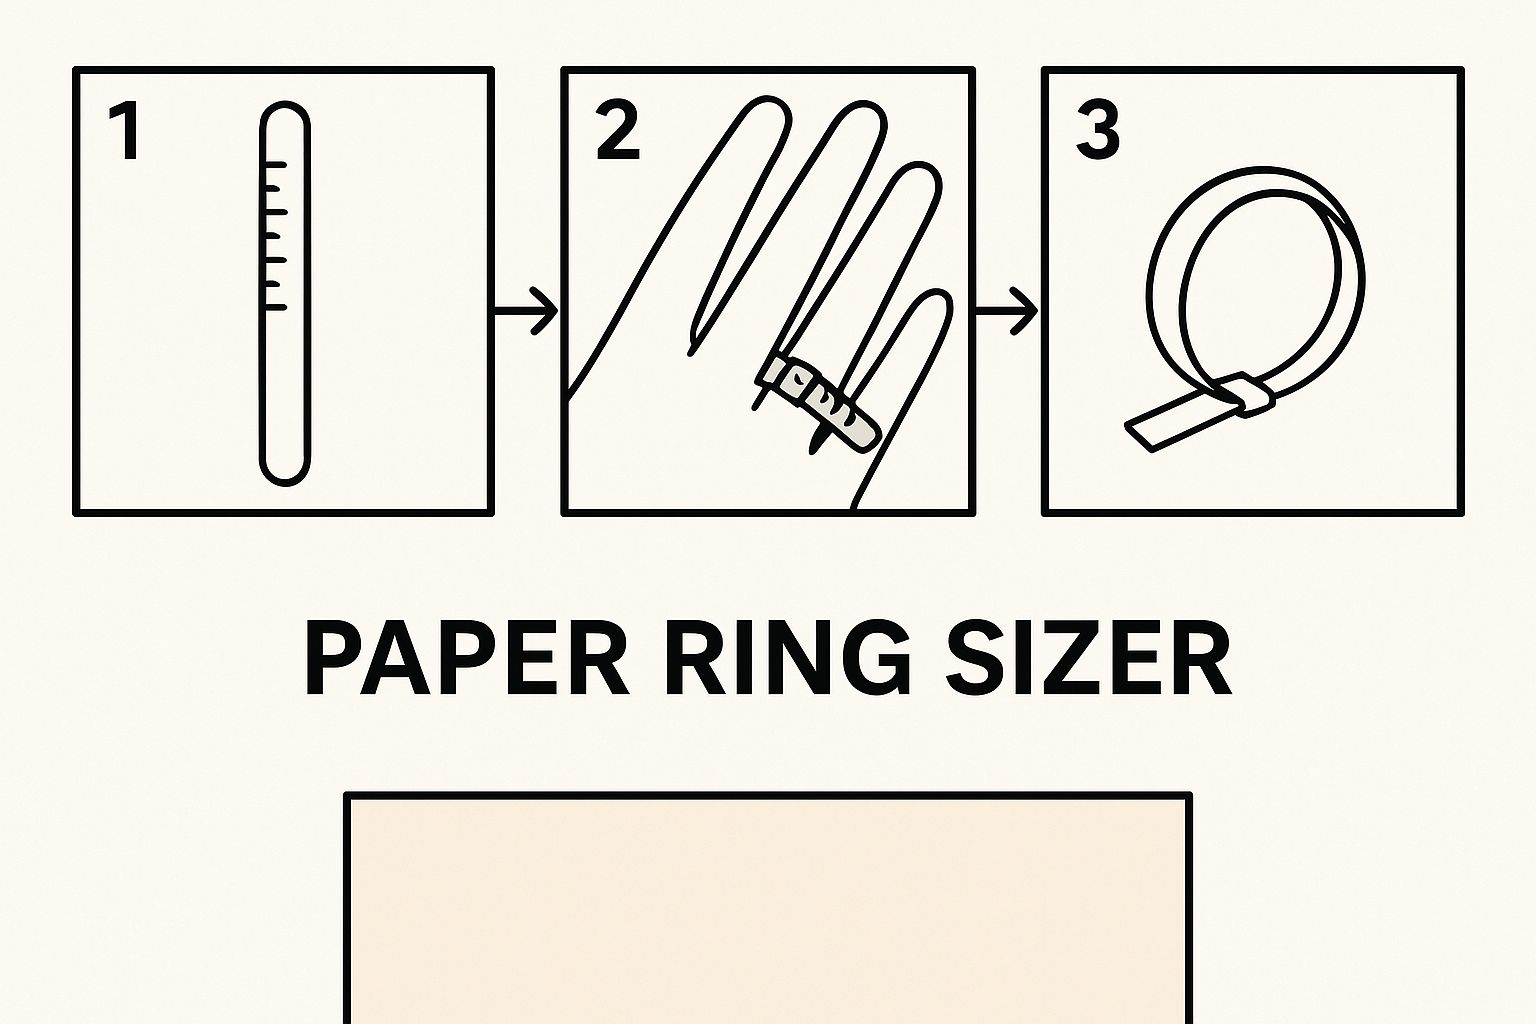
The key takeaway here is how snugly and flat the paper sits against the skin. This is the goal for achieving a true circumference measurement.
Executing The Measurement With Precision
First, cut a strip of paper approximately 10-12 cm long and no more than 5 mm wide. If the strip is too wide, it will not accurately replicate how a ring band sits on the finger, which can skew your result.
Next, wrap the paper snugly around the base of the finger you are sizing. It must be firm but not so tight that it constricts your skin. You are aiming for the "Goldilocks fit"—not too tight, not too loose.
With a fine-tipped pen, carefully mark the point where the end of the paper strip overlaps to form a complete circle. Avoid using a thick marker, as its broad tip can easily add a millimetre to your measurement, potentially shifting your size by a full half-size. Precision at this stage is non-negotiable.
Once marked, unwrap the paper and lay it flat against a ruler. Measure the length from the start of the strip to your mark in millimetres. This value is your finger's circumference. From there, you can use a ring size conversion chart to determine your correct Australian alphabetical size.
Advanced Tips for An Accurate DIY Measurement
Measuring only the base of your finger does not always provide the complete picture. For many individuals, the knuckle is considerably larger than the finger's base, which can make putting on and removing a ring a challenge.
A common mistake we see is measuring only the base. This results in a ring that fits perfectly once on but is nearly impossible to get over the knuckle. Always consider the knuckle in your measurement.
To account for this, we always recommend taking two separate measurements:
- The Base: Measure around the fleshy part of your finger where the ring will ultimately sit.
- The Knuckle: Measure around the widest part of your knuckle.
Your ideal ring size will likely fall between these two figures. The objective is a ring that is just large enough to slide over the knuckle (perhaps with a gentle twist) but does not spin freely once it is in place. If you land between two sizes, our professional advice is to opt for the slightly larger one to ensure comfort.
Common Pitfalls and How to Avoid Them
Even with the best intentions, several common mistakes can invalidate your at-home measurement. As professional jewellers, we've seen every possible error, and knowing what to avoid will save you significant time and frustration.
Here are the most frequent missteps to sidestep:
- Using Stretchy Materials: Never use standard string, wool, or an elastic band. These materials will stretch when pulled, resulting in a measurement that is far too small. Adhere to firm materials like paper or dental floss.
- Pulling Too Tightly: The paper or floss should feel as a real ring would. If you pull it too tight, you will measure for a ring that constricts your finger—which is not only uncomfortable but can also impede circulation.
- Measuring at the Wrong Time: Your fingers naturally swell and shrink throughout the day due to factors like temperature, hydration, and diet. For the most accurate result, measure your finger toward the end of the day, when it is likely to be at its largest and at a stable room temperature.
Using an Existing Ring for a Precise Fit
If you already possess a ring that fits one of your fingers perfectly, you are in an excellent position. Using a ring you already own is one of the most reliable methods for determining your size because it eliminates guesswork. It serves as a direct, physical reference that almost invariably leads to a flawless fit for your new piece.
This method is highly effective because you are measuring the ring itself, not your finger, thus bypassing common variables like daily finger swelling or the challenge of wrapping paper correctly. The key to success, of course, is applying the proper technique to translate that existing fit into an accurate size. There are two excellent approaches: measuring the inner diameter with a ruler or using a printable chart.
Measuring the Inner Diameter
This is an exceptionally straightforward and effective method, provided you have a quality ruler or measuring tape. The objective is simple: measure the internal diameter of your ring. This is the straight-line distance across the inside of the band, from one edge to the other, passing directly through the center.
First, place your ring on a flat, well-lit surface. Position your ruler directly over the middle of the ring. It is absolutely critical to measure from the very innermost edge to the opposite innermost edge. Even a fraction of a millimetre can alter the size, so proceed with care. Ensure the ruler’s zero mark is aligned perfectly with one inner side before reading the measurement on the other.
Once you have the diameter in millimetres, you can use our conversion chart to find the corresponding Australian alphabetical size. For example, an inner diameter of 18.03 mm translates perfectly to a size P. It is a wonderfully accurate technique, especially for standard, circular bands.
Using a Printable Ring Size Chart
Another popular and reliable method is to use a printable ring size chart. These charts feature circles corresponding to different ring sizes. The process involves placing your ring over the circles until you find the one that aligns perfectly with the inside edge of your band.
The most critical step is ensuring your chart is printed to the correct scale. Most printable charts include a reference line, often 50 mm long, which you must verify with a ruler after printing. If it does not measure exactly 50 mm, you must adjust your printer settings (typically by unchecking any "fit to page" or "scale to fit" options) and reprint. An improperly scaled chart will yield a completely inaccurate size.
When you're aligning your ring, the printed circle should be entirely visible, touching the inside edge of the band without any part of the black line being covered. If your ring appears to fall between two sizes, we almost always recommend choosing the larger one for a more comfortable fit.
Selecting the Right Reference Ring
The success of this entire method hinges on one final, crucial detail: the ring you choose to measure. Not all rings are created equal, and the style of your reference ring will directly impact the fit of your new one.
The most important factor to consider is the band width. A wider band will always feel much snugger than a narrow band of the very same size. Here is what our experts advise you keep in mind:
- For Wide Bands: If the new ring you desire has a wide band (e.g., 6 mm or more), you should ideally measure an existing ring that also has a wide band. If your reference ring is narrow, you will likely need to go up a half or even a full size for the new, wider ring to be comfortable.
- For Narrow Bands: Conversely, if you are purchasing a delicate, thin-banded ring, using a wide ring as your guide might lead you to select a size that ends up being too loose.
Ideally, your reference ring should not only fit you perfectly but also possess a similar width and profile to the new ring you are considering. This simple consideration is an industry secret for guaranteeing that perfect, comfortable fit from the very first wear.
Getting a Professional Fit With a Ring Sizer
While using string or an existing ring can provide a close estimate, nothing surpasses a dedicated ring sizer for true accuracy. This is the difference between an educated guess and a perfect fit. It is the same standard professional jewellers use to ensure every significant purchase is correct from the start.
Consider it the gold standard for measuring your ring size. These tools are engineered to eliminate all guesswork, providing you with absolute confidence that the ring you select—whether an engagement ring or a special gift—will feel as exceptional as it looks. Investing a little time with a proper sizer is the surest path to a comfortable, lifelong fit.
The Two Main Types of Ring Sizers
For professional-level accuracy, two excellent options are generally available. Each functions differently, but both yield a precise result. Understanding them will help you choose the one best suited to your needs.
- Plastic Multi-Sizer: This clever tool functions like a small, reusable belt or zip tie, with sizing marks printed along its length. It is a fantastic, low-cost option that you can use repeatedly for different fingers.
- Metal Sizing Ring Set: This is the tool you will almost always find on a professional jeweller's workbench. It consists of a collection of individual metal rings, each representing a specific size (e.g., L, L ½, M). Trying on the physical rings provides the most direct and tactile sense of how a band will sit.
Both of these tools are calibrated to official sizing standards, so you can trust the measurement they provide. This precision became especially critical in Australia after 1987, when the industry transitioned from imperial to metric standards. Now, each alphabetical size corresponds to a 1.25 mm increase in circumference, making standardised physical sizers essential for accuracy.
How to Use a Plastic Multi-Sizer Correctly
Using a plastic multi-sizer is straightforward, but a few small details are crucial for an accurate reading. Begin by forming a loop with the sizer and slipping it onto the finger intended for the ring.
Pull the end so the loop tightens comfortably. You are aiming for a snug fit at the base of your finger, but it should not be so tight that it pinches your skin or causes it to bulge.
The most critical step is to check the fit over your knuckle. The sizer must slide off with just a little resistance. If it comes off too easily, your ring will be too loose; if you have to force it, the ring will be far too tight. The optimal size is the one that requires a gentle twist to pass over the knuckle. The arrow on the sizer will then point directly to your correct Australian ring size.
Getting the Perfect Fit With a Metal Sizing Ring Set
A metal ring set provides the most true-to-life feel. By trying on solid, individual rings, you can experience exactly how a band of that size will sit and how it will feel passing over your knuckle.
Start by trying on a ring you believe is close to your size. The ideal fit is a ring that slides over your knuckle with a slight push or twist and then rests comfortably at the base of your finger without feeling restrictive. It should not spin around, but you should be able to turn it with minimal effort.
Test a few sizes around your initial guess. If a size N feels slightly loose, try an M ½. If it feels too snug, try an N ½. This hands-on comparison is the most effective way to find the perfect balance between security and comfort.
Nailing this measurement is especially important for rings with wider bands or intricate designs, as these can be much more challenging to alter later. For a deeper understanding of the complexities involved, our guide on ring resizing explains why it works and when it's best avoided offers expert insights. Taking the time to measure properly with a professional tool is always the superior choice.
Insider Tips for a Flawless Measurement
Obtaining your ring size involves more than just wrapping paper around your finger. Once you have mastered the basic methods, several subtle factors can mean the difference between a good fit and a perfect one. This is where decades of hands-on experience truly matter, and we are sharing our most valuable insights with you.
Consider these the professional details that elevate your measurement from an estimate to a certainty, giving you complete confidence when choosing a piece of jewellery designed to last a lifetime.
Timing Is Everything: The Best Time to Measure
Your fingers do not maintain a constant size throughout the day. They naturally swell and shrink in response to temperature, activity level, and even diet. This fluctuation is completely normal.
For the most reliable reading, we always advise measuring your finger at the end of the day. Late afternoon or early evening is ideal, as this is typically when your fingers are at their largest.
Measuring first thing in the morning will likely yield a size that is too small, as fingers are often slightly thinner after a night of rest. Similarly, avoid measuring immediately after a hot shower, an intense workout, or a salty meal, as all of these can cause temporary swelling and skew your result.
The goal is to measure when your body is at a stable, comfortable room temperature. This provides a true baseline that accounts for the minor, natural swelling that occurs daily.
Consider Temperature and Lifestyle
Your environment has a surprising influence on how your rings fit. The biology is simple: your fingers swell slightly in heat and contract in cold.
If you measure on a hot summer day, the resulting size might feel a bit loose once winter arrives. Conversely, measuring during a cold spell could lead to a ring that feels uncomfortably tight in warmer weather.
Consider your daily life:
- Do you live in a climate with dramatic seasonal changes?
- Do you work with your hands or in a profession where they are exposed to varying temperatures?
- Are you an athlete or someone who exercises frequently?
If you answered yes to any of these, it is best to aim for a size that feels comfortably snug when your hands are slightly swollen. This ensures the ring will remain secure when your fingers shrink but will not become constricting when they expand.
The Critical Impact of Band Width
This is one of the most important—and most frequently overlooked—factors in achieving the correct size. The width of a ring's band has a direct and significant effect on its fit. A wider band covers more skin, which creates more friction and results in a snugger feel.
The golden rule we always follow as jewellers is this: the wider the band, the snugger the fit.
- Standard Bands (2-4 mm): Your measured size should be a perfect match.
- Wide Bands (6 mm or more): You will almost certainly need to go up at least a half-size. For very wide bands of 8 mm or more, you may even need to go up a full Australian size.
- Delicate Bands (under 2 mm): Your standard size is typically accurate, as there is less metal in contact with your finger.
For instance, if you measure as a size M with a thin sizer but have fallen in love with a bold 7mm wedding band, a professional would recommend ordering a size M ½ or even N to ensure a comfortable fit for years to come.
How to Measure for a Surprise Ring
Determining your partner's ring size without revealing the secret requires some clever detective work. It's a classic challenge when planning a proposal, but a little subtlety goes a long way. Selecting the perfect piece is just one part of the journey; you can learn more about how to choose an engagement ring that makes saying yes unforgettable in our detailed guide.
Here are a few strategies that tend to yield the best results:
- "Borrow" an Existing Ring: This is the most reliable trick. Discreetly take a ring they often wear on the correct finger. Use our guide for measuring an existing ring, but pay close attention to which finger and hand they wear it on, as sizes vary.
- Enlist a Friend: A close friend can be your greatest ally. They could casually suggest trying on rings while shopping or inquire about ring sizes under the guise of buying a gift for someone else.
- The "Glove" Trick: While not perfectly accurate, making a mental note of their glove size can provide a jeweller with a helpful starting point for an estimation.
- Creative Comparison: If your hands are of a similar size, you could try on one of their rings on your own finger. Mark exactly where it rests with a pen, and a jeweller can use a professional sizer to determine the size based on that position.
By keeping these insider tips in mind, you are not just taking a measurement—you are ensuring the final ring feels as if it were crafted just for the person who will wear it.
Your Sizing Questions, Answered by Our Jewellers
Even with the best tools, determining the perfect ring size can raise a few questions. As professional jewellers who have guided countless clients to their ideal fit, we have heard them all. Consider this section a direct consultation with our workshop, where we provide the practical, expert advice we share with our clients every day.
Our goal is your complete confidence, so let us address some of the most common queries we encounter.
What Are the Average Ring Sizes in Australia for Men and Women?
This is an excellent question, particularly when planning a surprise. In Australia, our experience shows that the most common ring sizes for women typically fall between L and N. This corresponds to an inner diameter of approximately 16.5mm to 17.3mm.
For men, the average range is generally broader, landing between S and V, which is roughly 19.4mm to 20.6mm in diameter. We often use these figures to guide the popular sizes we maintain in our collection.
However—and this is a crucial distinction—these are merely averages. Every individual is unique, and finger sizes vary significantly. An average provides a good starting point for an estimate, but a personal measurement is the only way to guarantee a flawless fit.
My Knuckle Is Bigger Than the Base of My Finger. What Do I Do?
This is an extremely common scenario and is perfectly normal. The key is to find a size that is just snug enough to slide over the knuckle but does not spin once it rests on your finger.
When using a ring sizer, you want to feel slight resistance as it passes over the knuckle. Once it has settled at the base, it should feel secure and comfortable without being loose.
A professional tip for those using the string or paper method is to take two distinct measurements:
- First, measure the base of your finger where the ring will be worn.
- Second, measure the widest part of your knuckle.
Your ideal size is almost always between these two measurements, often a half-size larger than the base measurement. For individuals with particularly prominent knuckles, certain ring styles, such as a bypass or open-ended design, can offer a stylish and comfortable solution.
Can My Ring Size Actually Change Over Time?
Yes, it absolutely can. It is a common misconception that one's ring size is permanent. In reality, your finger size can fluctuate considerably throughout your life.
Factors such as weight changes, pregnancy, aging, and even certain medications can affect how your rings fit. It is also normal for fingers to swell in warm weather and shrink in the cold. Therefore, do not be concerned if a ring that fit perfectly a decade ago now feels slightly tight or loose.
We always recommend re-measuring your ring size every few years, or whenever you notice a change in how your rings fit. This is a key reason why we craft high-quality rings to be resizable, providing you with the flexibility to adapt to your body's natural changes over time.
How Does the Ring's Width Affect the Size I Need?
This is a fantastic and often overlooked detail that profoundly impacts comfort. When a ring has a wider band—for instance, 6mm or wider—it covers more surface area on your finger. This creates more friction and displaces more skin, making it feel significantly tighter than a thin, delicate band of the exact same size.
As a guiding principle, we always recommend going up a half, or even a full, size for wider bands compared to what you would wear in a standard 2-3mm band. Conversely, for very fine, delicate bands, your measured size is usually perfectly accurate.
An excellent tip is to measure your finger with a sizer that has a similar width to the ring you intend to purchase. For specific designs, it is also wise to check if the brand provides a dedicated guide, such as the Dahlia Project size chart. Getting this small detail right is an industry secret to ensuring a ring feels perfect from the moment you put it on.
Article created using Outrank


